前端自动化
前端自动化构建部署(CI/CD)
前端 CI/CD 一般是指持续集成、部署、发布的一个过程;
用白话文讲,就是你每次 git commit 代码后,都会自动的为你部署项目至 测试环境、预生产环境、生产环境,不用你每次手动的去打包后 cv 到多个服务器和环境;
前端 CI/CD 的意义:
- 提高开发人员生产力;
- 自动化发布;
- 提高代码质量;
- 更快地提供更新;
Devops 是个覆盖面广的技术业务范畴,各大云平台商都提供比较完整的接入。一般关键的流程包括:
- 通过 CI|CD 感知并触发工程构建,产出制品;
- 制品推送到制品管理平台写入版本记录,以便在回滚时实现自动化;
- 制品生成后,在发布单系统提单,走审核和发布流将产物部署上云服务;
- 和前端相关的云服务大致分 2 类:k8s(for nodejs 等后台服务)和 cos(前端静态资源),根据需求部署即可。(cos 上层或许还会接入 CDN 加速);
nginx 安装
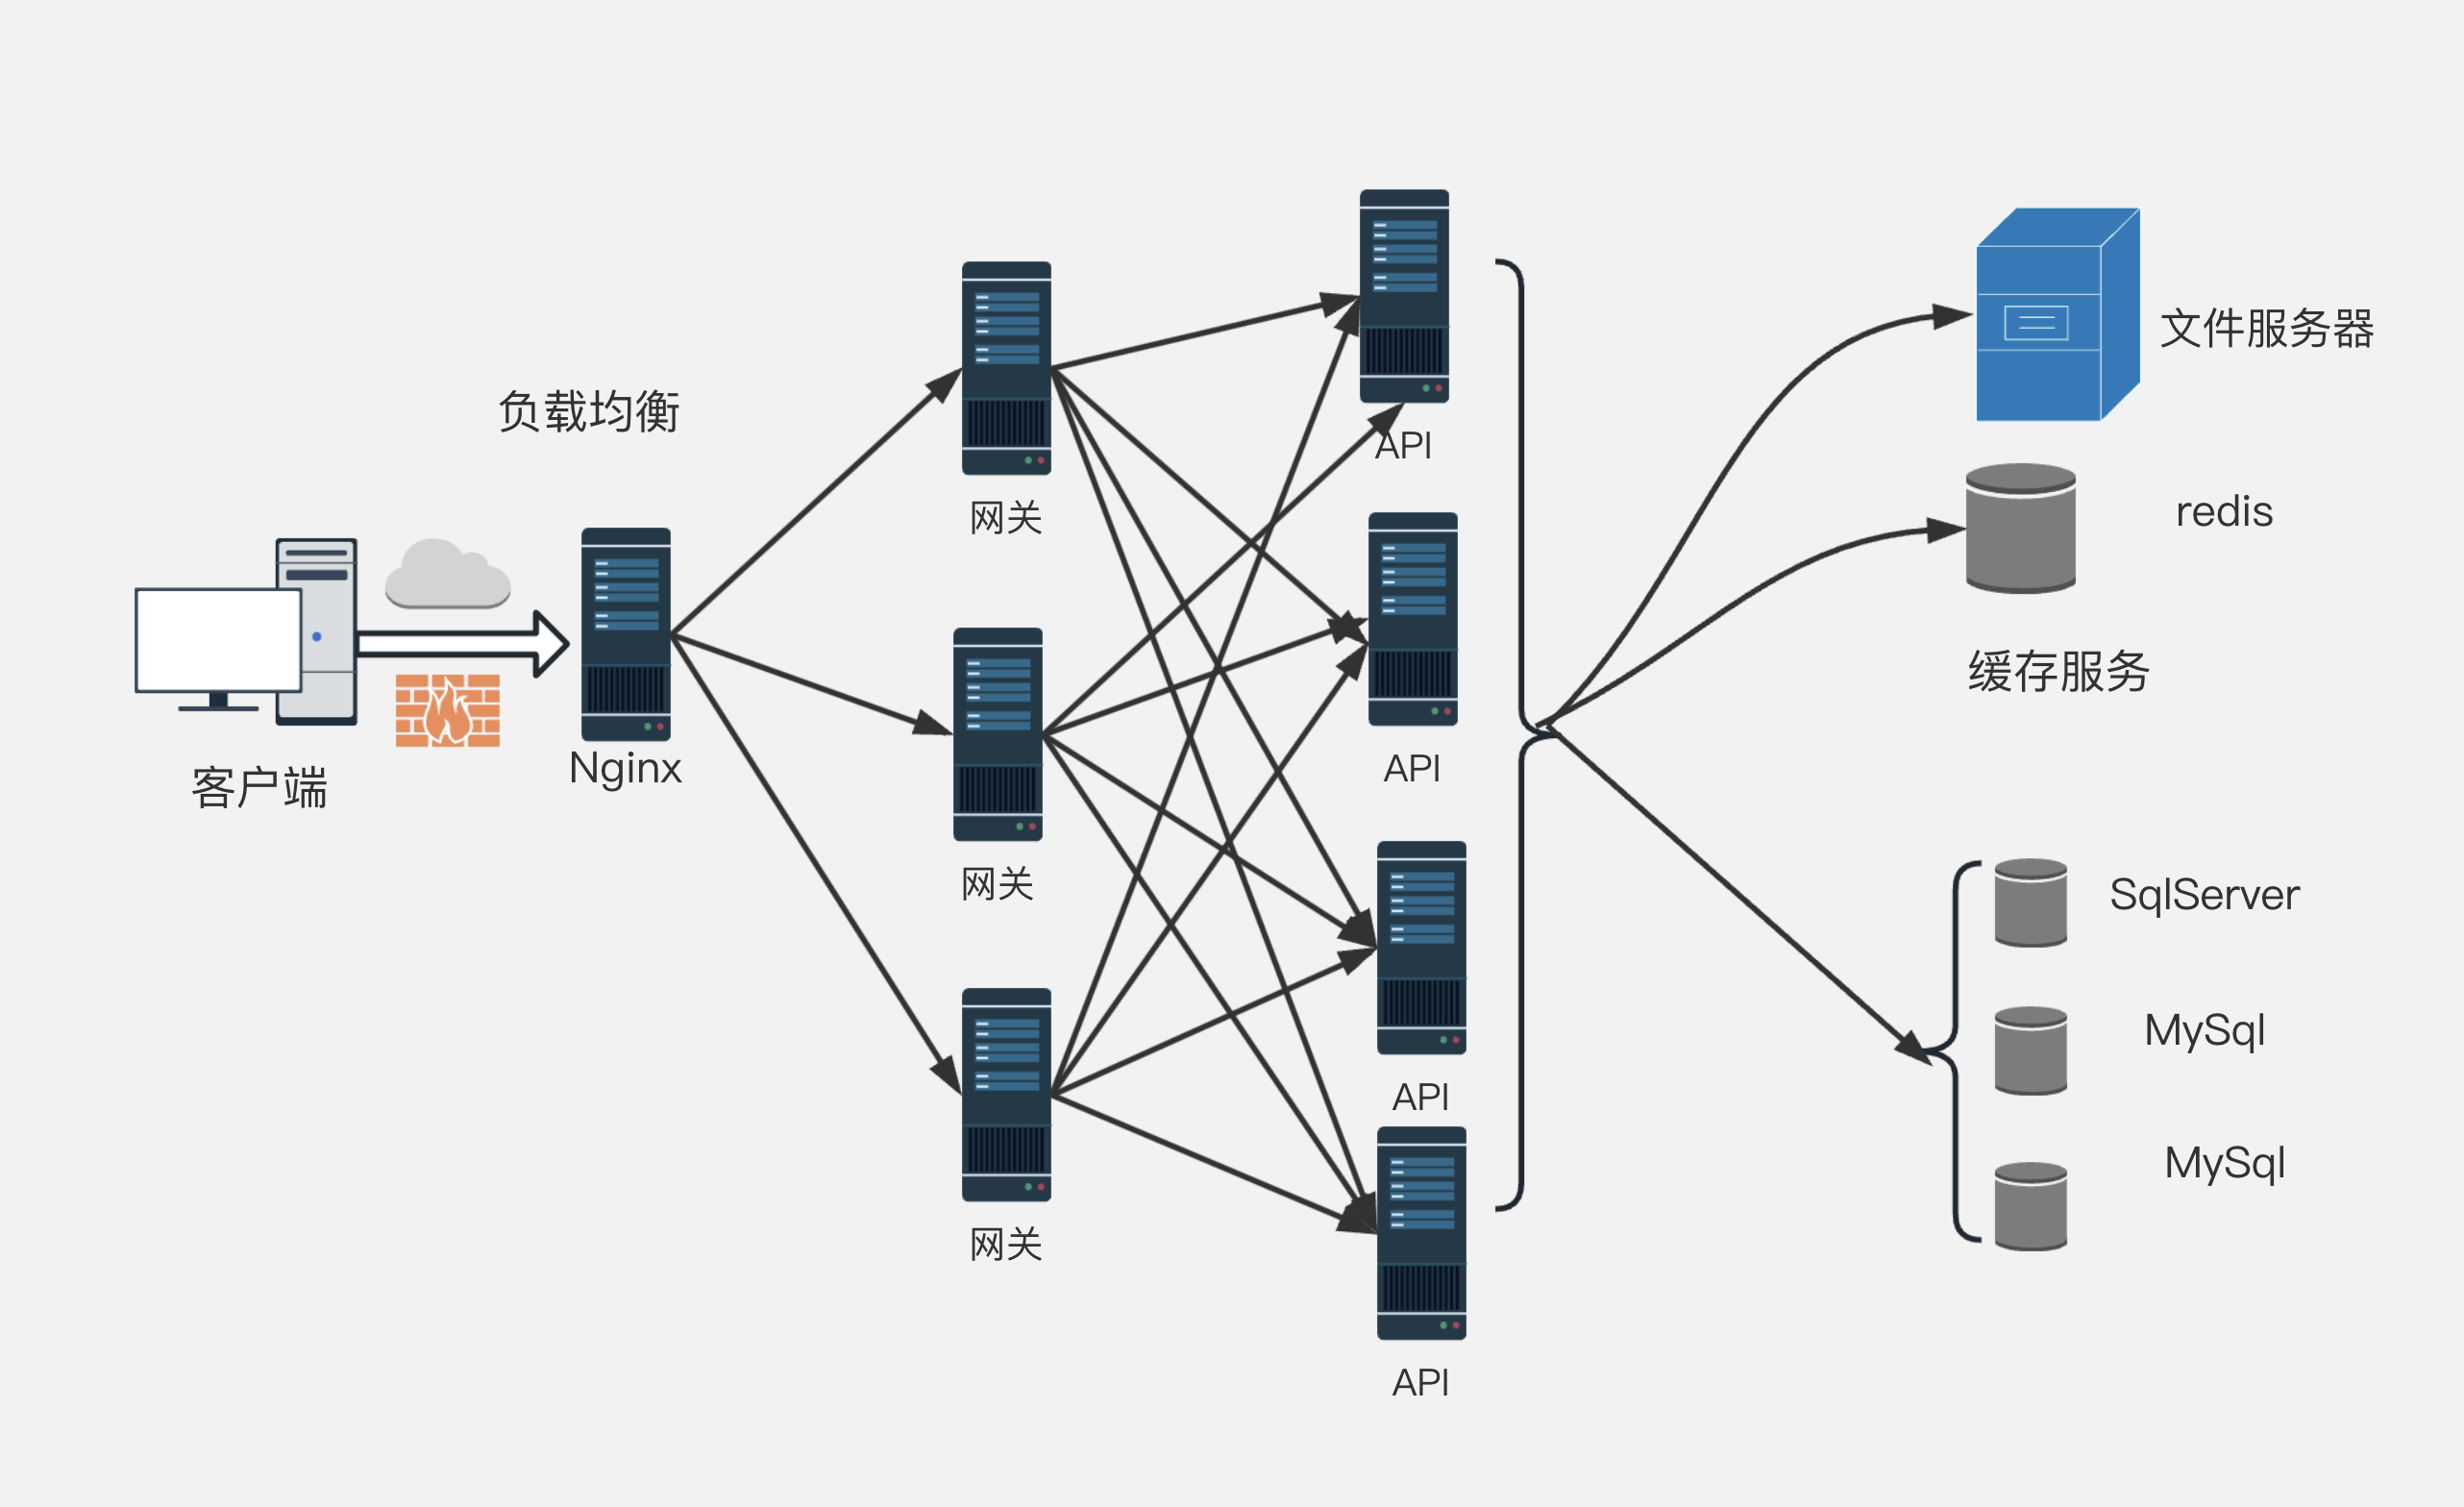
1.Nginx 的物理架构
2.配置 nginx 的 yum 源
在 Linux 上首次安装 nginx 之前,需要设置 nginx 软件包存储库。
# 进入yum源目录
cd /etc/yum.repos.d

# 在yum.repos.d这个目录下新建nginx.repo文件
# 添加下面内容到文件中
[nginx]
name=nginx stable repo
baseurl=http://nginx.org/packages/centos/$releasever/$basearch/
gpgcheck=0
enabled=1

# 清理并加载缓存
yum clean all && yum makeache

# 下载安装的nginx
yum install nginx -y

# 查看版本
nginx -v
3.启动 nginx
注意:在 Linux 上访问端口的话需要在服务器控制中心配置安全组对端口进行放行操作,否则不能进行访问。
# 启动nginx
systemctl start nginx

# 设置开机自启
systemctl enable nginx
4.查看 nginx 安装信息
安装完成后,通过 nginx -V 命令查看 Nginx 的安装信息:
# 定义编译后的nginx服务器文件的目录为/usr/share/nginx,这是默认的存放静态资源目录
prefix=/usr/share/nginx
# 定义编译后的nginx的sbin文件的目录为/usr/sbin/nginx
sbin-path=/usr/sbin/nginx
# 定义编译后的nginx的主配置文件nginx.conf的路径及名称为/etc/nginx/nginx.conf
conf-path=/etc/nginx/nginx.conf
# 设置主要错误,警告和诊断文件的名称及路径为/var/log/nginx/error.log
error-log-path=/var/log/nginx/error.log
# 设置编译后的http服务器的主请求日志文件的名称为/var/log/nginx/access.log
http-log-path=/var/log/nginx/access.log
# 设置nginx.pid将存储主进程的进程ID 的文件名及路径为/run/nginx.pid
pid-path=/run/nginx.pid
5.常用的 nginx 命令
systemctl 系统命令:
# 开机配置
systemctl enable nginx # 开机自动启动
systemctl disable nginx # 关闭开机自动启动

# 启动Nginx
systemctl start nginx # 启动Nginx成功后,可以直接访问主机IP,此时会展示Nginx默认页面

# 停止Nginx
systemctl stop nginx

# 重启Nginx
systemctl restart nginx

# 重新加载Nginx
systemctl reload nginx

# 查看 Nginx 运行状态
systemctl status nginx

# 查看Nginx进程
ps -ef | grep nginx
Nginx 应用程序命令:
# 向主进程发送信号,重新加载配置文件,热重启
nginx -s reload
# 重启 Nginx
nginx -s reopen
# 快速关闭
nginx -s stop
# 等待工作进程处理完成后关闭
nginx -s quit
# 查看当前 Nginx 最终的配置
nginx -T
# 检查配置是否有问题
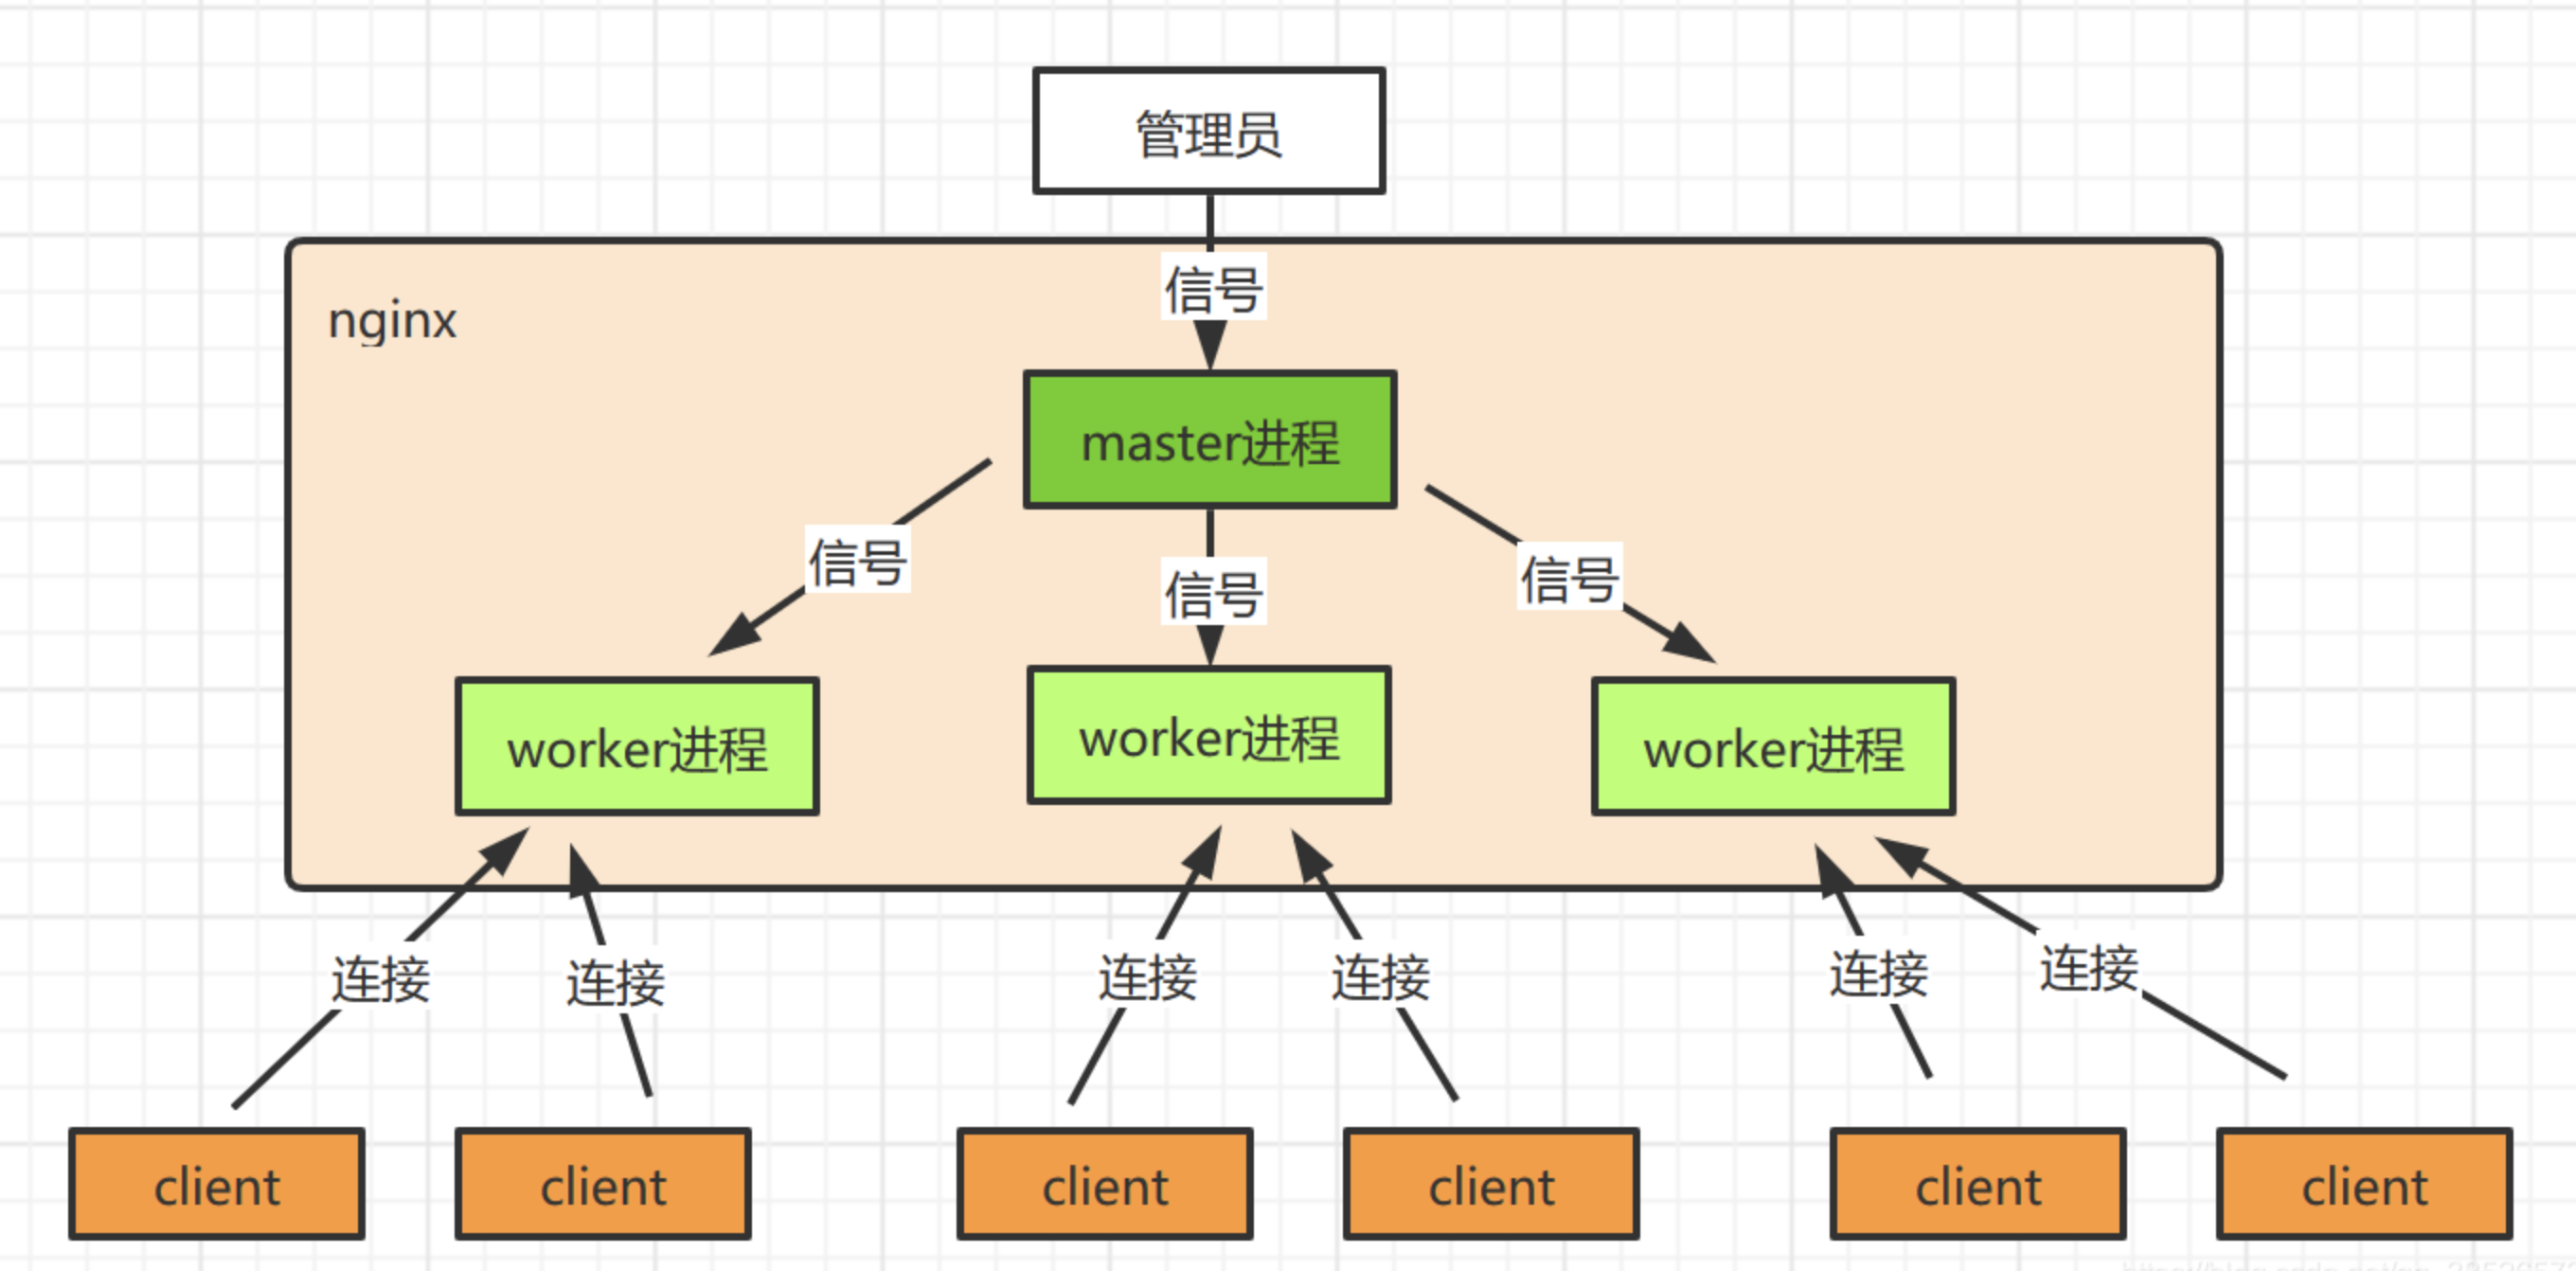
nginx -t6.Nginx 的进程结构
7.防火墙设置
# 放行nginx端口号,目前大陆的服务器需要服务器备案才可以访问默认的80和443端口号
firewall-cmd --add-port=80/tcp --zone=public --permanent
# 放行特定端口号
firewall-cmd --add-port=9000/tcp --zone=public --permanent
# 注意:放行端口号之后需要重启防火墙
systemctl restart firewalld
# 查看防火墙放行端口号
firewall-cmd --list-port
Nginx 的配置文件
#定义Nginx运行的用户和用户组
user root;

#nginx进程数,通常设置成和cpu的数量相等
worker_processes 4;

#全局错误日志定义类型,[debug | info | notice | warn | error | crit]
#error_log  logs/error.log;
#error_log  logs/error.log  notice;
#error_log  logs/error.log  info;


#进程pid文件
#pid        logs/nginx.pid;

events {
    #单个进程最大连接数(最大连接数=连接数+进程数)
    #根据硬件调整,和前面工作进程配合起来用,尽量大,但是别把cup跑到100%就行。
    worker_connections  1024;

    #keepalive 超时时间
    keepalive_timeout 60;
}


#设定http服务器,利用它的反向代理功能提供负载均衡支持
http{
    #文件扩展名与文件类型映射表
    include mime.types;
    #默认文件类型
    default_type application/octet-stream;
    #默认编码
    charset utf-8;
    #gzip模块设置
    gzip on; #开启gzip压缩输出
    gzip_min_length 1k;    #最小压缩文件大小
    gzip_buffers 4 16k;    #压缩缓冲区
    gzip_http_version 1.0; #压缩版本(默认1.1,前端如果是squid2.5请使用1.0)
    gzip_comp_level 2;     #压缩等级
    gzip_types text/plain application/x-javascript text/css application/xml;    #压缩类型,默认就已经包含textml,所以下面就不用再写了,写上去也不会有问题,但是会有一个warn。
    gzip_vary on;

    #负载均衡配置
    upstream upstreamdemo {
        #upstream的负载均衡,weight是权重,可以根据机器配置定义权重。weigth参数表示权值,权值越高被分配到的几率越大。
        server 192.168.80.121:80 weight=3;
        server 192.168.80.122:80 weight=2;
        server 192.168.80.123:80 weight=3;
    }

    #虚拟主机的配置
    server {
        #监听端口
        listen 80;
        #域名可以有多个,用空格隔开
        server_name www.cghbh.com cghbh.com;
        root /data/www/html;
        #默认入口文件名称
        index index.html index.htm index.php;

        # 反向代理接口
        location /api {
            #请注意此处端口号不能与虚拟主机监听的端口号一样(也就是server监听的端口)
            proxy_pass http://127.0.0.1:88;
        }
    }
}
重定向
永久重定向 301
server {
  listen 80;
  server_name www.example.com;
  return 301 http://example.com$request_uri;
}
临时重定向 302
server {
  listen 80;
  server_name yourdomain.com;
  return 302 http://otherdomain.com;
}
将 http 重定向到 https
server {
  listen 80;
  server_name example.com;
  return 301 https://example.com$request_uri;
}
Nginx 解决跨域问题
server {
  listen 80;
  server_name api.xxx.com;

  add_header 'Access-Control-Allow-Origin' '*';
  add_header 'Access-Control-Allow-Credentials' 'true';
  add_header 'Access-Control-Allow-Methods' 'GET,POST,HEAD';

  location / {
    proxy_pass http://127.0.0.1:3000;
    proxy_set_header X-Real-IP $remote_addr;
    proxy_set_header X-Forwarded-For $proxy_add_x_forwarded_for;
    proxy_set_header Host  $http_host;
  }
}
配置 gzip 压缩
server {
  listen 8088;
  #开启gzip
  gzip on;
  #低于1kb的资源不压缩
  gzip_min_length 1k;
  #压缩级别1-9,越大压缩率越高,同时消耗cpu资源也越多,建议设置在5左右。
  gzip_comp_level 9;
  # 文件类型
  gzip_types image/png image/jpeg image/gif image/svg+xml;
  # 在响应消息头中添加 Vary:Accept-Encoding,使代理服务器根据请求头中的 Accept-Encoding 识别是否启用 gzip 压缩;
  gzip_vary on;
  root /root/gzip;
  index index.html index.htm;
}
配置 https
server {
    listen 80;
    server_name www.cghbh.com cghbh.com;
    # 强制重定向到https的协议
    return 301 https://www.cghbh.com$request_uri;
}

server {
    #SSL 默认访问端口号为 443
    listen 443;
    ssl on;
    # 请填写绑定证书的域名
    server_name www.cghbh.com cghbh.com;
    gzip on;
    gzip_min_length 1k;
  	gzip_comp_level 6;
    #请填写证书文件的相对路径或绝对路径
    ssl_certificate /etc/nginx/cert/www.cghbh.com_nginx/www.cghbh.com_bundle.crt;
    #请填写私钥文件的相对路径或绝对路径
    ssl_certificate_key /etc/nginx/cert/www.cghbh.com_nginx/www.cghbh.com.key;
    ssl_session_timeout 5m;
    #请按照以下协议配置
    ssl_protocols TLSv1.2 TLSv1.3;
    #请按照以下套件配置,配置加密套件,写法遵循 openssl 标准。
    ssl_ciphers ECDHE-RSA-AES128-GCM-SHA256:HIGH:!aNULL:!MD5:!RC4:!DHE;
    ssl_prefer_server_ciphers on;

    # 如果访问的是cghbh.com,则重定向到https://www.cghbh.com,且permanent是永久重定向
    if ( $host != 'www.cghbh.com' ) {
        rewrite ^(.*)$ https://www.cghbh.com$1 permanent;
    }

    location / {
        proxy_cache_revalidate on;
        proxy_cache_min_uses 3;
        proxy_cache_use_stale error timeout updating http_500 http_502 http_503 http_504;
        proxy_cache_lock on;
        root /home/main-docs;
        index index.html index.htm;
    }
}
适配 PC 端和移动端
Nginx 可以通过内置变量$http_user_agent,获取到请求客户端的 userAgent,从而知道用户处于移动端还是 PC,进而控制重定向到 H5 站还是 PC 站。
 location / {
        # 移动、pc设备适配
        if ($http_user_agent ~* '(Android|webOS|iPhone|iPod|BlackBerry)') {
            set $mobile_request '1';
        }
        if ($mobile_request = '1') {
            rewrite ^.+ http://mysite-base-H5.com;
        }
    }
反向代理
配置示例:
server {
    listen 80;
    server_name example.com;

    location / {
        proxy_pass http://localhost:8080;
        proxy_set_header Host $host;
        proxy_set_header X-Real-IP $remote_addr;
        proxy_set_header X-Forwarded-For $proxy_add_x_forwarded_for;
    }
}proxy_pass:定义代理的后端服务器的地址。
proxy_set_header:修改从客户端传递到代理服务器的请求头。
proxy_hide_header:隐藏从代理服务器返回的响应头。
proxy_redirect:修改从代理服务器返回的响应头中的Location和Refresh头字段。
注意
- 当使用
proxy_pass指令时,确保后端服务器是可用的,否则 Nginx 将返回 502 错误。 - 使用
proxy_set_header确保后端服务器接收到正确的请求头。 - 如果后端服务器和 Nginx 在不同的机器上,确保网络连接是稳定的。
负载均衡
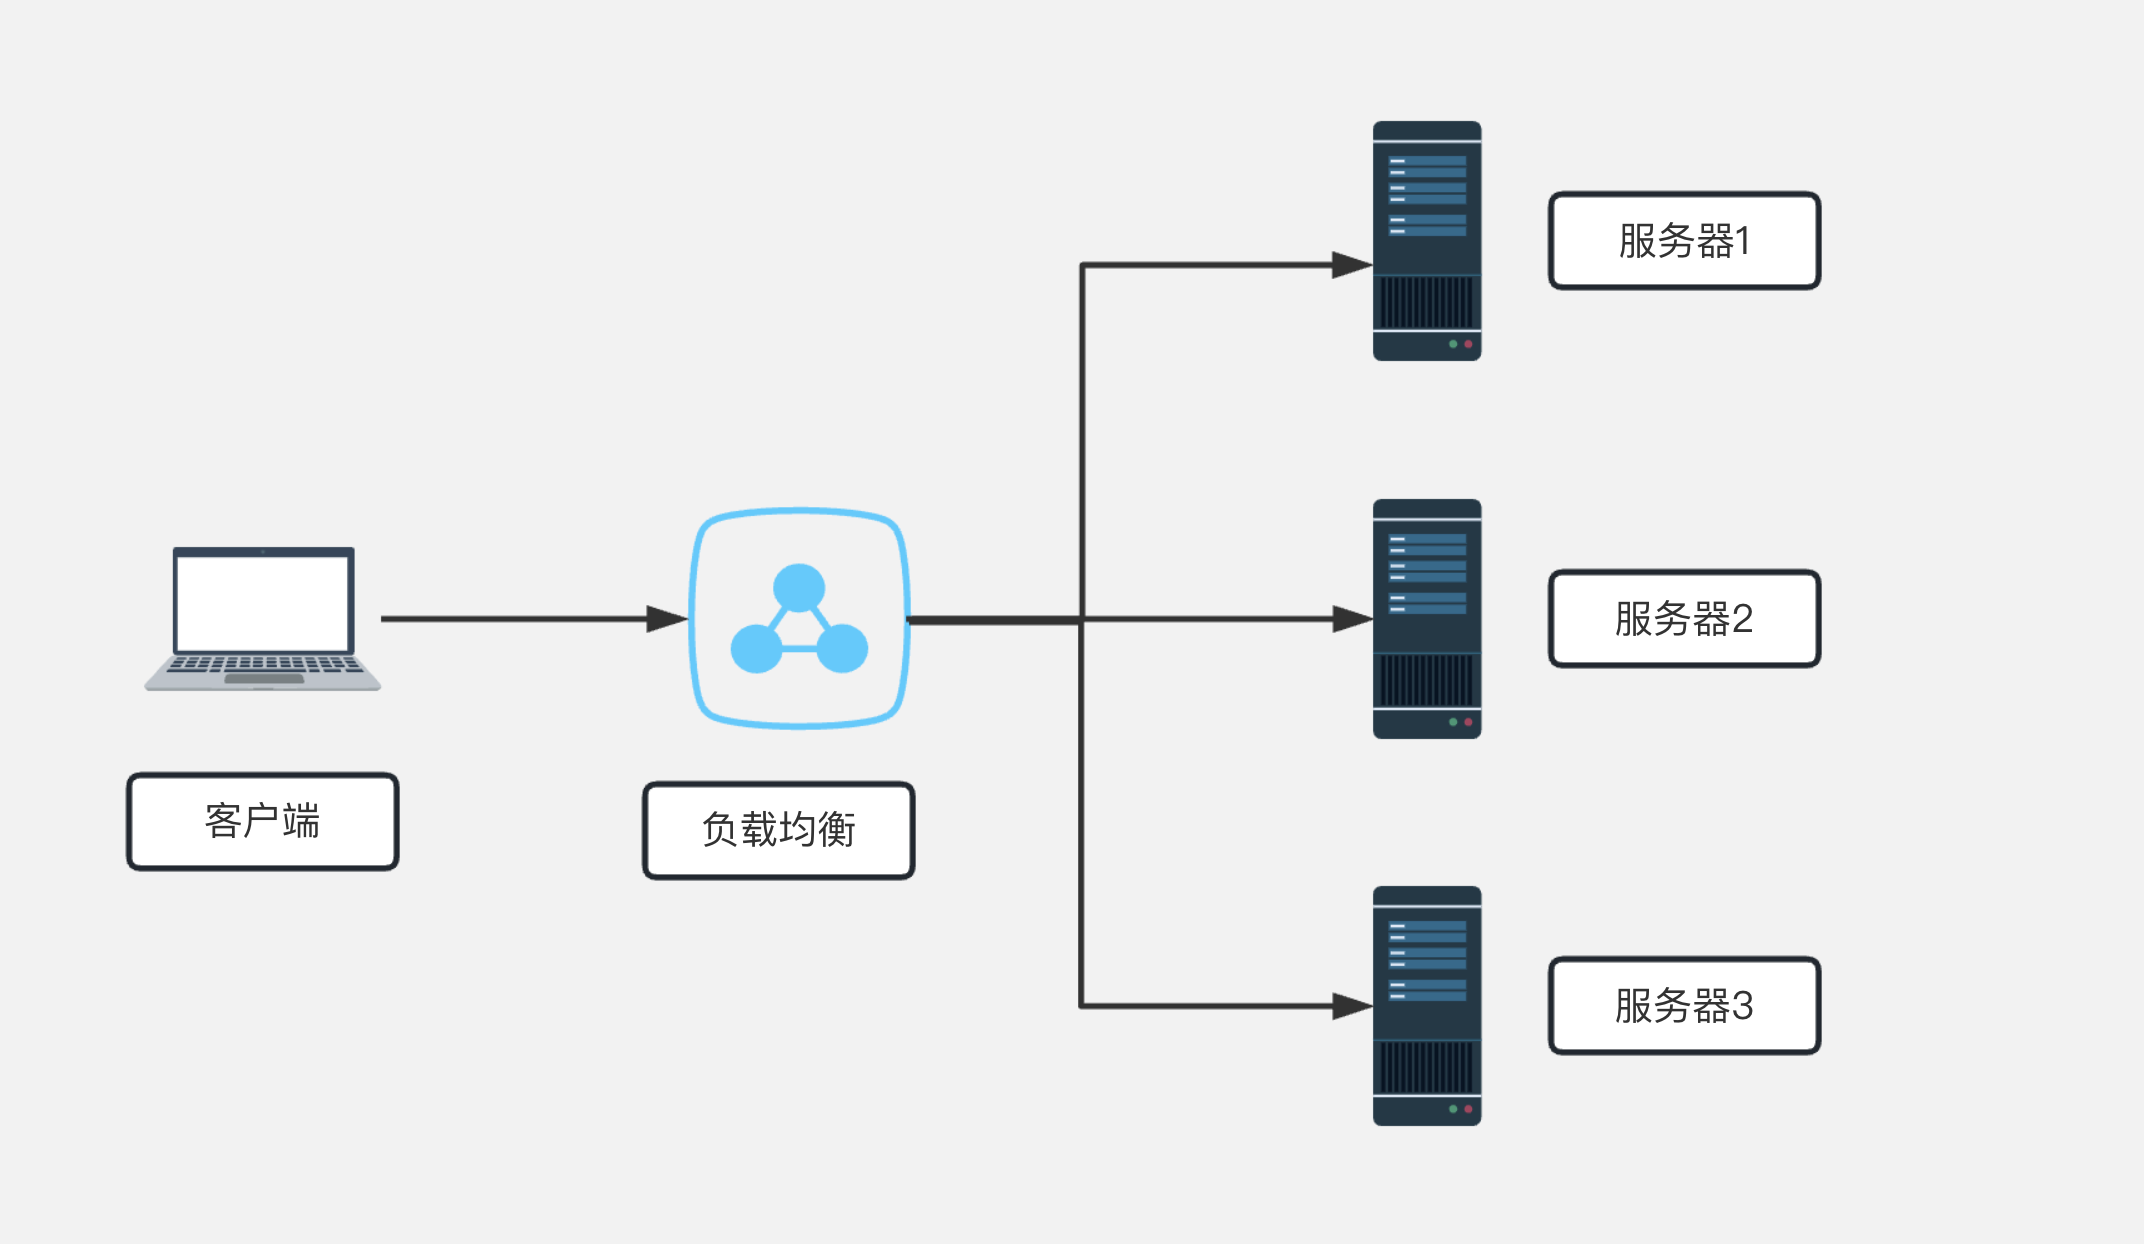
轮询
nginx 默认就是轮询其权重都默认为 1,服务器处理请求的顺序:ABCABCABCABC....
upstream demoServer {
    server 192.168.8.1:7070;
    server 192.168.8.2:7071;
    server 192.168.8.3:7072;
}
加权轮询
根据配置的权重的大小而分发给不同服务器不同数量的请求。如果不设置,则默认为 1。下面服务器的请求顺序为:ABBCCCABBCCC....
upstream demoServer {
    server 192.168.8.1:7070 weight=1;
    server 192.168.8.2:7071 weight=2;
    server 192.168.8.3:7072 weight=3;
}
最少连接
把请求分配到连接数最少的 server
Nginx 也可以将请求发送给当前处理请求数量最少的服务器上。可以分担各个服务器之间的压力。但是如果各个服务器本身能力就不匹配,Nginx 一味把请求打到最小连接数量的服务器中的话,也可能会造成服务器压力过大。
upstream  demoServer {
    least_conn;
    server   192.168.99.100:8001;
    server   192.168.99.100:8002;
}
ip_hash
每个请求会按照访问 ip 的 hash 值分配,这样同一客户端连续的 Web 请求都会被分发到同一 server 进行处理,可以解决 session 的问题。如果 server 挂掉,能自动剔除。
upstream  demoServer {
    ip_hash;
    server   192.168.99.100:8001;
    server   192.168.99.100:8002 backup;
}

#每个设备的状态设置为:
#1.down表示单前的server暂时不参与负载
#2.weight为weight越大,负载的权重就越大。
#3.max_fails:允许请求失败的次数默认为1.当超过最大次数时,返回proxy_next_upstream模块定义的错误
#4.fail_timeout:max_fails次失败后,暂停的时间。
#5.backup: 其它所有的非backup机器down或者忙的时候,请求backup机器。所以这台机器压力会最轻。
ip_hash 可以和加权轮询结合使用。
适配 PC 端和移动端
Nginx 可以通过内置变量$http_user_agent,获取到请求客户端的 userAgent,从而知道用户处于移动端还是 PC,进而控制重定向到 H5 站还是 PC 站。
 location / {
        # 移动、pc设备适配
        if ($http_user_agent ~* '(Android|webOS|iPhone|iPod|BlackBerry)') {
            set $mobile_request '1';
        }
        if ($mobile_request = '1') {
            rewrite ^.+ http://mysite-base-H5.com;
        }
    }
负载均衡
轮询
nginx 默认就是轮询其权重都默认为 1,服务器处理请求的顺序:ABCABCABCABC....
upstream mysvr {
    server 192.168.8.1:7070;
    server 192.168.8.2:7071;
    server 192.168.8.3:7072;
}
加权轮询
根据配置的权重的大小而分发给不同服务器不同数量的请求。如果不设置,则默认为 1。下面服务器的请求顺序为:ABBCCCABBCCC....
upstream mysvr {
    server 192.168.8.1:7070 weight=1;
    server 192.168.8.2:7071 weight=2;
    server 192.168.8.3:7072 weight=3;
}
nginx 的变量参数 详解
$args                    #请求中的参数值
$query_string            #同 $args
$arg_NAME                #GET请求中NAME的值
$is_args                 #如果请求中有参数,值为"?",否则为空字符串
$uri                     #请求中的当前URI(不带请求参数,参数位于$args),可以不同于浏览器传递的$request_uri的值,它可以通过内部重定向,或者使用index指令进行修改,$uri不包含主机名,如"/foo/bar.html"。
$document_uri            #同 $uri
$document_root           #当前请求的文档根目录或别名
$host                    #优先级:HTTP请求行的主机名>"HOST"请求头字段>符合请求的服务器名.请求中的主机头字段,如果请求中的主机头不可用,则为服务器处理请求的服务器名称
$hostname                #主机名
$https                   #如果开启了SSL安全模式,值为"on",否则为空字符串。
$binary_remote_addr      #客户端地址的二进制形式,固定长度为4个字节
$body_bytes_sent         #传输给客户端的字节数,响应头不计算在内;这个变量和Apache的mod_log_config模块中的"%B"参数保持兼容
$bytes_sent              #传输给客户端的字节数
$connection              #TCP连接的序列号
$connection_requests     #TCP连接当前的请求数量
$content_length          #"Content-Length" 请求头字段
$content_type            #"Content-Type" 请求头字段
$cookie_name             #cookie名称
$limit_rate              #用于设置响应的速度限制
$msec                    #当前的Unix时间戳
$nginx_version           #nginx版本
$pid                     #工作进程的PID
$pipe                    #如果请求来自管道通信,值为"p",否则为"."
$proxy_protocol_addr     #获取代理访问服务器的客户端地址,如果是直接访问,该值为空字符串
$realpath_root           #当前请求的文档根目录或别名的真实路径,会将所有符号连接转换为真实路径
$remote_addr             #客户端地址
$remote_port             #客户端端口
$remote_user             #用于HTTP基础认证服务的用户名
$request                 #代表客户端的请求地址
$request_body            #客户端的请求主体:此变量可在location中使用,将请求主体通过proxy_pass,fastcgi_pass,uwsgi_pass和scgi_pass传递给下一级的代理服务器
$request_body_file       #将客户端请求主体保存在临时文件中。文件处理结束后,此文件需删除。如果需要之一开启此功能,需要设置client_body_in_file_only。如果将次文件传 递给后端的代理服务器,需要禁用request body,即设置proxy_pass_request_body off,fastcgi_pass_request_body off,uwsgi_pass_request_body off,or scgi_pass_request_body off
$request_completion      #如果请求成功,值为"OK",如果请求未完成或者请求不是一个范围请求的最后一部分,则为空
$request_filename        #当前连接请求的文件路径,由root或alias指令与URI请求生成
$request_length          #请求的长度 (包括请求的地址,http请求头和请求主体)
$request_method          #HTTP请求方法,通常为"GET"或"POST"
$request_time            #处理客户端请求使用的时间,单位为秒,精度毫秒; 从读入客户端的第一个字节开始,直到把最后一个字符发送给客户端后进行日志写入为止。
$request_uri             #这个变量等于包含一些客户端请求参数的原始URI,它无法修改,请查看$uri更改或重写URI,不包含主机名,例如:"/cnphp/test.php?arg=freemouse"
$scheme                  #请求使用的Web协议,"http" 或 "https"
$server_addr             #服务器端地址,需要注意的是:为了避免访问linux系统内核,应将ip地址提前设置在配置文件中
$server_name             #服务器名
$server_port             #服务器端口
$server_protocol         #服务器的HTTP版本,通常为 "HTTP/1.0" 或 "HTTP/1.1"
$status                  #HTTP响应代码
$time_iso8601            #服务器时间的ISO 8610格式
$time_local              #服务器时间(LOG Format 格式)
$cookie_NAME             #客户端请求Header头中的cookie变量,前缀"$cookie_"加上cookie名称的变量,该变量的值即为cookie名称的值
$http_NAME               #匹配任意请求头字段;变量名中的后半部分NAME可以替换成任意请求头字段,如在配置文件中需要获取http请求头:"Accept-Language",$http_accept_language即可
$http_cookie
$http_host               #请求地址,即浏览器中你输入的地址(IP或域名)
$http_referer            #url跳转来源,用来记录从那个页面链接访问过来的
$http_user_agent         #用户终端浏览器等信息
$http_x_forwarded_for
$sent_http_NAME          #可以设置任意http响应头字段;变量名中的后半部分NAME可以替换成任意响应头字段,如需要设置响应头Content-length,$sent_http_content_length即可
$sent_http_cache_control
$sent_http_connection
$sent_http_content_type
$sent_http_keep_alive
$sent_http_last_modified
$sent_http_location
$sent_http_transfer_encoding
附加案例:
前端要实现一个长按图片下载的功能,要求访问图片的时候在返回的文件头加上点东西:
nginx

location ~* \.(png|jpg|jpeg|gif)$ {
    add_header Access-Control-Allow-Origin "*"; #此处解决跨域调用问题,之前前端要画图配置的
    if ($args = "down") { #nginx的if语句有大坑,所以需要重新配置跨域
        add_header Access-Control-Allow-Origin "*"; #不加这一行前面的莫名奇妙会消失
        add_header content-disposition "attachment";
    }
}
即浏览器正常访问图片 http://localhost/1.jpg 会正常显示
访问图片 http://localhost/1.jpg?down 会弹出下载框